ASL Primer II
 As promised, this is the second post about ASL. Here I will take the information laid out in the first post, and discuss it in terms of the phases of play.
While, in a sense, ASL is about moving and shooting, it is also about timing, control, and opportunity. Some of the realities of combat are included "as-is", and some are abstracted. For example, ASL includes some of the "fun" parts of combat tactics like drawing the enemy's fire in order to advance elsewhere, but does not include wounds and other ill effects on squad individuals.
In ASL, one full game turn represents a full turn--of 8 phases--for each side. The scenario will specify which side goes first. Although each side takes a turn being the active player, both sides participate in almost every phase and every action. One side will be the active player for a full turn, then the other side will do the same. Remember: a turn represents 2 minutes of real time.
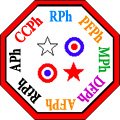
The image above was captured from VASL (Virtual Advanced Squad Leader, which is a separate program from the more generic Vassal). It is a marker that can be placed next to the board on the screen to help players keep track of the current phase. I use the mnemonic RPM-DARAC to remember the 8 phases: Rally, Prep Fire, Movement, Defensive Fire, Advancing Fire, Rout, Advance, Close Combat.
Note that the phase acronyms on the marker each have a different color. This color matches the color of the informational counters used on the board. The phase color shows when the counters are removed. DM+4 counters are blue; they are removed at the end of the Rally Phase. Residual Fire counters are green; they are removed at the end of the Movement Phase. First Fire and Final Fire counters are purple; they are removed at the end of the Defensive Fire Phase.
Since 7 of the 8 phases involve moving and/or shooting, it can be cumbersome for a beginner to put it all together. Trust me; I am one. It all comes down to what your units are doing (or planning to do) on a turn.
 Rally Phase: The active player takes any new units that will enter the board this turn (defined by the scenario), and places them at any allowed location on the board edge.
The active player then rallies his broken units. First, he may attempt to rally one broken unit where no leader present. Then, he rallies any broken leaders, followed by any broken units where unbroken leaders are present.
The inactive player may then do the same thing, except he does not get the free non-leader rally attempt.
Rallying is simply a 2d6 roll less than or equal to the unit's morale level. If the rally is in a building, the unit gets a -1 bonus. If a leader is performing the rally on a unit, you can add the leader bonus. If the unit was just broken in the previous turn (and from other factors) it will have a DM+4 (Desperation Morale) counter on it. This represents the temporarily disorganized state when a unit falls apart due to overwhelming fire. The counter is removed whether the unit rallies or not.
 Prep Fire Phase: The active player may fire any/all units that have an enemy in range (normal or long) and LOS. Units that fire get PREP FIRE counters which means they cannot fire or move again during that turn (all units can move during the Advance Phase).
Movement Phase: The active player may now move any/all units that did not Prep Fire. Each unit that is going to move must make all the movements it is going to before moving another unit; once another unit is moved, you cannot move a previously moved unit again during the Movement Phase.
A basic unit gets 4 movement points (MP). A units moving its entire movement (starting and ending) along a road gets an additional 2 MP. A leader (and any units moving with it) gets 6 MP (7 along a road).
Expending MP represents a normally cautious military advance. Assault Movement is when units use extra caution. In this case they can move only a single hex. Units using normal movement are said to be using Non-Assault Movement and give a -1 bonus to any shots fired upon them while moving.
 Defensive Fire Phase: This is the most complicated part of ASL (at least for me). This phase can be pictured as overlapping the Movement Phase as well as occurring after it. This is when the inactive player can fire at the active player's units that are moving (or otherwise expending MP). After the Movement Phase, defensive firing can continue, but without certain benefits.
Each MP expended by a unit provides an opportunity for it to be fired upon. For example, if a unit expended 2 MP to enter a building hex, it could be fired on twice by an enemy unit. This is an attempt to convey the time it takes to stop and open a door, etc.
The inactive player's units can fire an unlimited number of times (per turn, still only once per MP) but with less and less effect as well as increased requirements. The first time a unit fires it has no restrictions, but receives a FIRST FIRE counter. The second time a unit fires it must be within normal range, and no farther than the closest known enemy unit. This is called Subsequent First Fire and the firepower is halved. If you wait until after the Movement Phase, you can only fire a second time at an adjacent hex. After the second shot, a unit receives a FINAL FIRE counter. From this point on, the unit may only fire when an enemy unit enters an adjacent hex. This is called Final Protective Fire, and can only occur during the Movement Phase. Firepower is halved since the unit has already fired, but doubled because the enemy is in an adjacent hex. Units using this form of attack are desperate and have a chance to break. [This paragraph, for me, is the meat of ASL. I may even have some details wrong.]
All defensive fire shots during the Movement Phase leave half their firepower as Residual Fire in the target hex. This amount is further reduced by one column on the IFT for every hex of hindrance. For example, if a shot is made in the 12 column on the IFT, then a Residual Fire 6 counter is placed. Units moving into that hex later in the Movement Phase undergo an attack of 6. Remember that everything is happening [sort of] simultaneously.
Advancing Fire Phase: The active player may now fire with any unit that did not Prep Fire (even those that moved) at half FP. Some units are better at this than others, possessing what is called Assault Fire capability. This is indicated on the counter by an underlined FP value. When units of this type fire during this phase, you halve their FP, round up, and add 1. These are the kinds of units you want to use when moving and shooting at the same time.
Rout Phase: The active player must now Rout all units with a DM+4 counter. Units in a building may stay where they are unless adjacent to an enemy unit. Routing units have 6 MP to spend. This represents a general lack of discipline. They are not moving with any caution, just running away. They must move no closer to any known enemy (that they can see), and must enter the nearest building or woods if they can.
Each hex the unit moves into that has an open LOS to an enemy unit can cause Interdiction. The enemy unit doesn't have to fire. Just the fact that it could fire is enough. The routing unit must make a Morale Check and follow all normal results. If it is able, it may then continue its rout, subject to further Interdiction.
A routing unit may also use Low Crawl. I would compare this to Assault Movement. They can move only 1 hex, but are immune from Interdiction, even if in the open.
Morale and Routing are key components of ASL. In many games with conflict, you can leave a unit in a hopeless situation until it is obliterated. In ASL, units will break and rout when subject to overwhelming attacks. You can do nothing to force them. You must manage your leaders and your unit's morale effectively.
Advance Phase: The active player may move all of his unbroken units 1 hex regardless of previous fire or movement. This is the only time a unit may enter a hex with an enemy unit. If so, a Close Combat (CC) counter is placed on the hex.
 Close Combat Phase: Any hexes where there are units of both sides now perform a round of Close Combat. The active player decides the order. The process is different from normal combat. First is a check for Ambush. Each side rolls a d6 and adds in any of several modifiers based on leaders, broken units, etc. If one side is less than the other by 3 or more, they have ambushed them. In an ambush, the attacks occur sequentially, applying the effects of the first before resolving the counter-attack. If there is no ambush, the attacks are resolved simultaneously.
The strengths of the opposing units are turned into a ratio (eg 1-4, 1-2, 1-1, 3-2, 2-1), which a chart resolves to a Kill#. Rolling lower than this number eliminates the enemy units. Matching the number causes a Casualty Reduction (full squad becomes half squad, half squad is eliminated). In a non-ambush situation, it is possible that both sides eliminate each other.
If, after the Close Combat round, there are still opposing units in the hex, it is marked with a MELEE counter, indicating that the Close Combat will continue into the next turn.
In summary, the active player fires his units during the Prep Fire and Advancing Fire Phases, and moves his units during the Movement, Advance, and Rout Phases. The inactive player fires his units during the Movement and Defensive Fire Phases, and only moves his units during the Rout Phase.
The above 8 phases are repeated for each player until a victory condition has been met, or until the prescribed number of turns has elapsed.
These 2 posts were probably over 50% of the rules in Starter Kit #1, but just the tiniest speck of the full ASL rules. There are many many more types of terrain, support weapons, ordnance, tanks and other vehicles, snipers, demolition, smoke, on and on.
The beauty of the Starter Kits is that you can learn the concepts one step at a time, and stop when you reach your comfort level. At this point, the concepts in Starter Kit #1 are more than enough for me. I was able to write these 2 posts mostly from memory, but there's a lot of details that I left out--partly because they would be too much, and partly because I don't know them.
"Keep your powder dry."
posted by ekted @ 8:03 AM
10 comments
![]()


10 Comments:
Those summaries are great! Thanks for taking the time to write them.
Now for the big question: Are you going to reformat these two summaries for normal printing, or is that left as an exercise for the reader? (I'm seriously inquiring.)
I don't really do web. I know just enough HTML to cause trouble. Feel free to copy/paste/format into Word or PDF.
But if you are really going to go to all that trouble, just buy Starter Kit #1 for $20 when it's reprinted in June.
It took me at least 8 hours of live voice chat to have a basic understanding, plus another 8 or so playing (and we are not done the first scenario yet). I am no expert, even in the basics. Kevin sent me about 7 corrections to this post alone. It would take me more time than that to teach someone else, as I don't have it organized in my head as well as Kevin does.
VASL is free to download and use.
http://www.vasl.org/
Also, read this document to give you much more detail than I have already provided. If is doesn't scare you off, then we can try.
http://www.vftt.co.uk/whatsasl.pdf
I accidentally stumbled across this summary of the ASL game turn. It looks pretty good, though you left out a detail of rallying that I think is important to note: Self-rally attempts get a +1 DRM (usually canceling the -1 for being in building/woods).
is self rally only for elite troops? Not sure but just to add only the ATTACKER can attempt self rally. Also one on reduction, I dont think all units are broke if K/# occurs. Reduce then NMC using # as neccessary as a modifier.
"Active player" = attacker.
I don't see where I mention K/# anywhere, but you are correct.
you didnt, you wrote something about all reductions lead to a broken unit. I cant find it anymore no problems thanks for a great article.
Paul, all counters with a squared morale (with a square around it) on the broken side can self rally. The active player and self rally his first broken mmc really attempt even if the morale is not squared.
This comment has been removed by a blog administrator.
This comment has been removed by a blog administrator.
Post a Comment
<< Home